Self Balancing Robot
Completed: July 2021
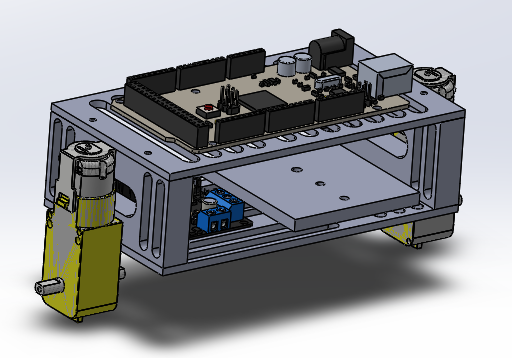
CAD of self-balancing robot
This was my first personal project. During the summer, I decided I wanted to try making a self-balancing robot. I thought it would be a good introductory project to apply what I learned from my control systems course from the previous semester, as well as learn a little more about Arduino and using motors.
The chassis was 3D printed and attached with thermal set inserts and fasteners. The Arduino, accelerometer, motor driver, motors and battery case were attached to the chassis using M3 fasteners, washers and nuts.
I used a tutorial to help with the coding logic because it was my first solo project using an Arduino. The code used the accelerometer to measure the angle of the robot and then, using a PID function and the motors, applied a force in the opposite direction of motion to keep the robot upright. Through the tutorial, I learned about using interruptions with Arduino.
Reflecting on the project, there are definitely some changes I would make. First, I would make sure the battery holder was more accessible. I didn’t put in a power switch on the robot, so to turn it on and off, I would have to remove and insert a battery. Since the holder was in a precarious position, it became a real hassle to do so. Next, I would make sure to put the accelerometer at the centre of gravity. I found that because the sensor was offset from the axis of rotation, it skewed the data. The robot still worked, but I predict it would have worked better over the centre of gravity. Finally, I would use thinner and smaller wheels. The wheels I purchased were large, so sometimes the robot was able to stand freely, which defeated the purpose of having it be “self-balancing”. I wanted the robot to be able to stand due to its movement, so using smaller wheels would have worked better for that.